Showing posts with label biriyani. Show all posts

Saturday, March 27, 2021

Fish Biriyani!

 The sheer convenience of working from home has turned me into a biriyani maker to my own surprise. It is happening mainly due to the fact that I can make a plan and prepare fried onions and raita ahead of time. Planning is more organized because of weekly online grocery shopping where I am sure of what we can have that week. So just add chicken, beef or lamb to the list, then tomatoes, cilantro and mint and you are pretty much set so long as you have biriyani rice, cashew nuts and raisins in stock. H always signs on to make papads which is one less worry. My dwarf lime tree has yielded enough for a year and the limes are preserved through freezing or simple refrigeration which covers for any lime needs. Same story with the curry leaf plant. There is always a container or two of yogurt and enough eggs in the house to round it out.   

Not sure if I'd ever tried making fish biriyani before but now that it is done, there is no looking back. Absence of daily commute is essential for this activity as otherwise a quick trip to the Indian grocery store for frozen king fish (neymeen) may not happen at all. The main advantage of this fish is a single round bone in the middle which is easily discarded.  A fact that was quite agreeable to my bone weary son who likes biriyanis in general. Molu seemed reluctant to fight with the fish at all but I am sure she will come around. Chicken is her goto for biriyani.

Elements of most biriyanis are the same but the protein here being fish, I didn't resort to my trusted Instapot this time. Alas, not much was lost and the final product more than made up for the sad omission of this trusted utensil. On top of recently acquired biriyani knowhow, I also referred to this vlog from salukitchen. There is a quite efficiency in this smart lady's no-nonsense yet tasty, gourmet quality and flavorful recipes with which she sustains her five person family on a regular basis. A feat not easily achieved even if one tried. Without Doordash to fill in the gaps, I am sure to be a nervous wreck by the end of the pandemic stay at home period where the distinction between work and home gets blurrier by the day. Simply closing the laptop just is not enough separation anymore I tell ya. Ok, 'nough rambling for now and let us go to our recipe for the day and see where that takes us.

In The Mix

red onions - 4 big (2 for masala, 1 for seasoning)
olive oil - enough to coat
salt to taste 
cashews and raisins - a handful each for seasoning
raita, papads

king fish - 5 or 6 large disc like fleshy pieces with skin on to hold shape
    turmeric powder  - 1 1/2 tsp
    kashmiri chili powder - 5 tsp or as needed
    garam masala - 3 tsp
    crushed black pepper - 11/2 tsp
    salt to taste

basmati rice - 6 cups
water - 7 cups
    cinnamon - 2 small pieces
    bay leaf - 1 or 2 small
    cardamom - 4
    cloves - 3
    olive oil - 1 tbsp
    salt to taste

cinnamon - 2 thin 1.5" pieces
cardamom - 2
bay leaf - 1 or 2 small
cloves - 2 or 3

ginger-garlic paste - 3 tsp
tomatoes - 3 medium or 2 large chopped
yogurt - 2 tbsp
coriander - 1/2 tsp
curry leaves - 1 or 2 sprigs
lime juice - from 1/2 a lime
salt to taste

cilantro - a bunch, chopped
mint - 1/2 a bunch chopped

olive oil - as needed

How To Do

Make ahead steps:
Make raita and refrigerate. Fry papads and keep in an airtight container. Air fry 3 sliced onions tossed with oil, salt at 390 for 6-8 min on each side. Remove 2 onions worth and fry remaining onions for 2 min on each at 390 or till golden.

Wash and drain the rice and add to rice cooker along with water. Add all italicized ingredients under rice to this, stir gently mainly to mix in the salt and cook as usual. The outcome is always perfectly cooked biriyani rice.

Mix all italicized ingredients under fish and use 1/2 of it to marinate the thawed fish. Make sure not to use extra water as there is enough water in the fish itself. Set to marinate overnight or for at least 15 minutes outside. 

Preheat to 300C if using oven for baking.

Heat oil in a flat pan and fry cashews and onions and set aside. Keep pan on low heat especially if using a cast-iron pan as it distributes and holds the heat evenly.

Add more oil as needed and shallow fry fish pieces for 1-2 min on each side or until 75% cooked. Remove and set aside.


Add the second set of cinnamon, cardamom, bayleaf and cloves to the same oil and saute for 1-2 min. Add fried onions set aside for masala and mix well. Add curry leaves, ginger garlic paste, remaining half of mixed spice powders along with coriander powder and saute all together till aroma rises in the air. Check salt and add as needed.

Add chopped tomatoes, saute for 2-3 min, add 1/4 cup cilantro, 2 tbsp mint, yogurt and lime juice and stir well together for 3-4 min. 

Now add the fish pieces one by one, making sure to cover each with enough masala. Cover and cook for 5 min on low heat. 


For stove-top baking, remove all except some masala and one or two pieces of fish and layer with rice as given below. Cover and cook for 5-7 min and set aside to cool for 10 minutes.

For oven baking,  slightly grease an oven safe dish with oil and layer bottom with some masala and one or two fish pieces. Then add the rice, sprinkled on top with golden onions, fried cashews, raisins, cilantro and mint. Add another layer of masala and fish and top with rice layer sprinkled with all the seasonings. Cover with aluminum foil and bake for 10 minutes at 300C. 


Remove from oven and let cool for 10 min before serving with raita and papad. It behooves you to remember the location of fish pieces so the digging in won't break them before it gets on the plate. Yum.. I am drooling since all of it is just a memory now. Until next time..😋

Tuesday, January 19, 2021

Instapot : Malabar Chicken Biriyani


How many biriyani's can one make at home anyways? My answer to this remained the same up until the pandemic. There is only one and it had to be with lamb if it is to be home made. Then COVID-19 happened and the four of us gathered back under one roof again with no outside options for food until we discovered Doordash. Enter instapot and along with it the versatile biriyani which after all is the best known single dish Indian meal. We need raita and papad but they are accompaniments.  A single dish meal along with a single pan to wash is a real incentive. So I started cooking various items to see what works best with the instapot. The 3qt pot I had didn't yield any leftovers to justify all the prep work. So I got an 8qt to check it out. In retrospect a 6qt would've been fine but I was done trying. Now the 8qt is the appliance of choice for biryanis while the 3 qt is dependable for anything else. 

Most instapot adapted  biriyanis I tried came out good but the one that worked out the best in terms of customer satisfaction and flavor profile is this particular version. Especially for chicken lovers. The base recipe is from malluspice whose recipes are all top notch especially with their authentic malabar flavors. Made some tweaks to use it with instapot and air fryer and for general personal convenience so I can go back to it easily when we feel like it is homemade biriyani time. 

For more flavorful lamb, one might depend on the lamb biriyani recipe from before and adapt for instapot. I'll make a post once I try it out with the ipot. One thing to note is that I don't use ghee anymore because the kids don't like it. Olive oil is always king here when it comes to cooking oil.

In the Mix

basmati rice - 3 cups (250 ml cup)
water - 3 cups

chicken - 2 1/2 lbs (use a mix of drumsticks, boneless chicken breast and thigh) 
                               up to 4 lbs could work with this recipe as I have found.

onions - 5 (1 for raita, 2 1/2 for cooking and 1 1/2 for seasoning)
olive oil - 2 tbsp or enough to coat the onions

cashew nuts - 1/4 cup
raisins - 1/4 cup
cinnamon stick - 2" piece
olive oil - 2 tbsp
garam masala - 1 tbsp or as needed

poppy seeds : 1 1/2 tsp
fennel seeds : 1 1/2 tsp
-use a coffee grinder and make in into a paste by adding some water after

 B
green serrano chili - 100grams
ginger - 50 grams
garlic - 50 grams
-measure with a kitchen scale and chop all together in a chopper

C
cloves - 4
cardamom - 4
bay leaf - 1
- gently crush all together

D
pepper powder - 1 tsp or to taste
turmeric powder  - 1/2 tsp or as needed
biryani masala - 2 tsp or as needed (sub with garam masala)

E
yogurt - 1/2 cup
lemon juice - 2 tsp 
salt - to taste

F
cilantro - 1 1/2 cups chopped (1 cup for cooking and 1/2 for seasoning)
mint - 1 cup chopped
curry leaves - a few sprigs


How To Do

The most time consuming item for me when making biriyani is the onion. So I want to get this out of the way as early as possible. Once I decide on biriyani, I set out to make onions, along with marinating the chicken. If marinating chicken overnight, then make onions also the day before to save time.

Thinly slice all the onions. Use one to make raita and keep refrigerated.
Preheat the air fryer to 390.
Sprinkle oil and salt and gently squeeze the onions together to mix well.
Spread onions in the air fryer basket and do 12 minutes, with a stir at 6 minutes
Remove about 2 1/2 worth of onions for cooking.
Heat the remaining onions for 2-3 more minutes until golden brown for seasoning
Keep all onions refrigerated if you are making the biriyani the next day.

The above steps can be done in the traditional wok and frying in oil or in a regular oven at 425 for 20 min on each side. But I like the air fryer the best.

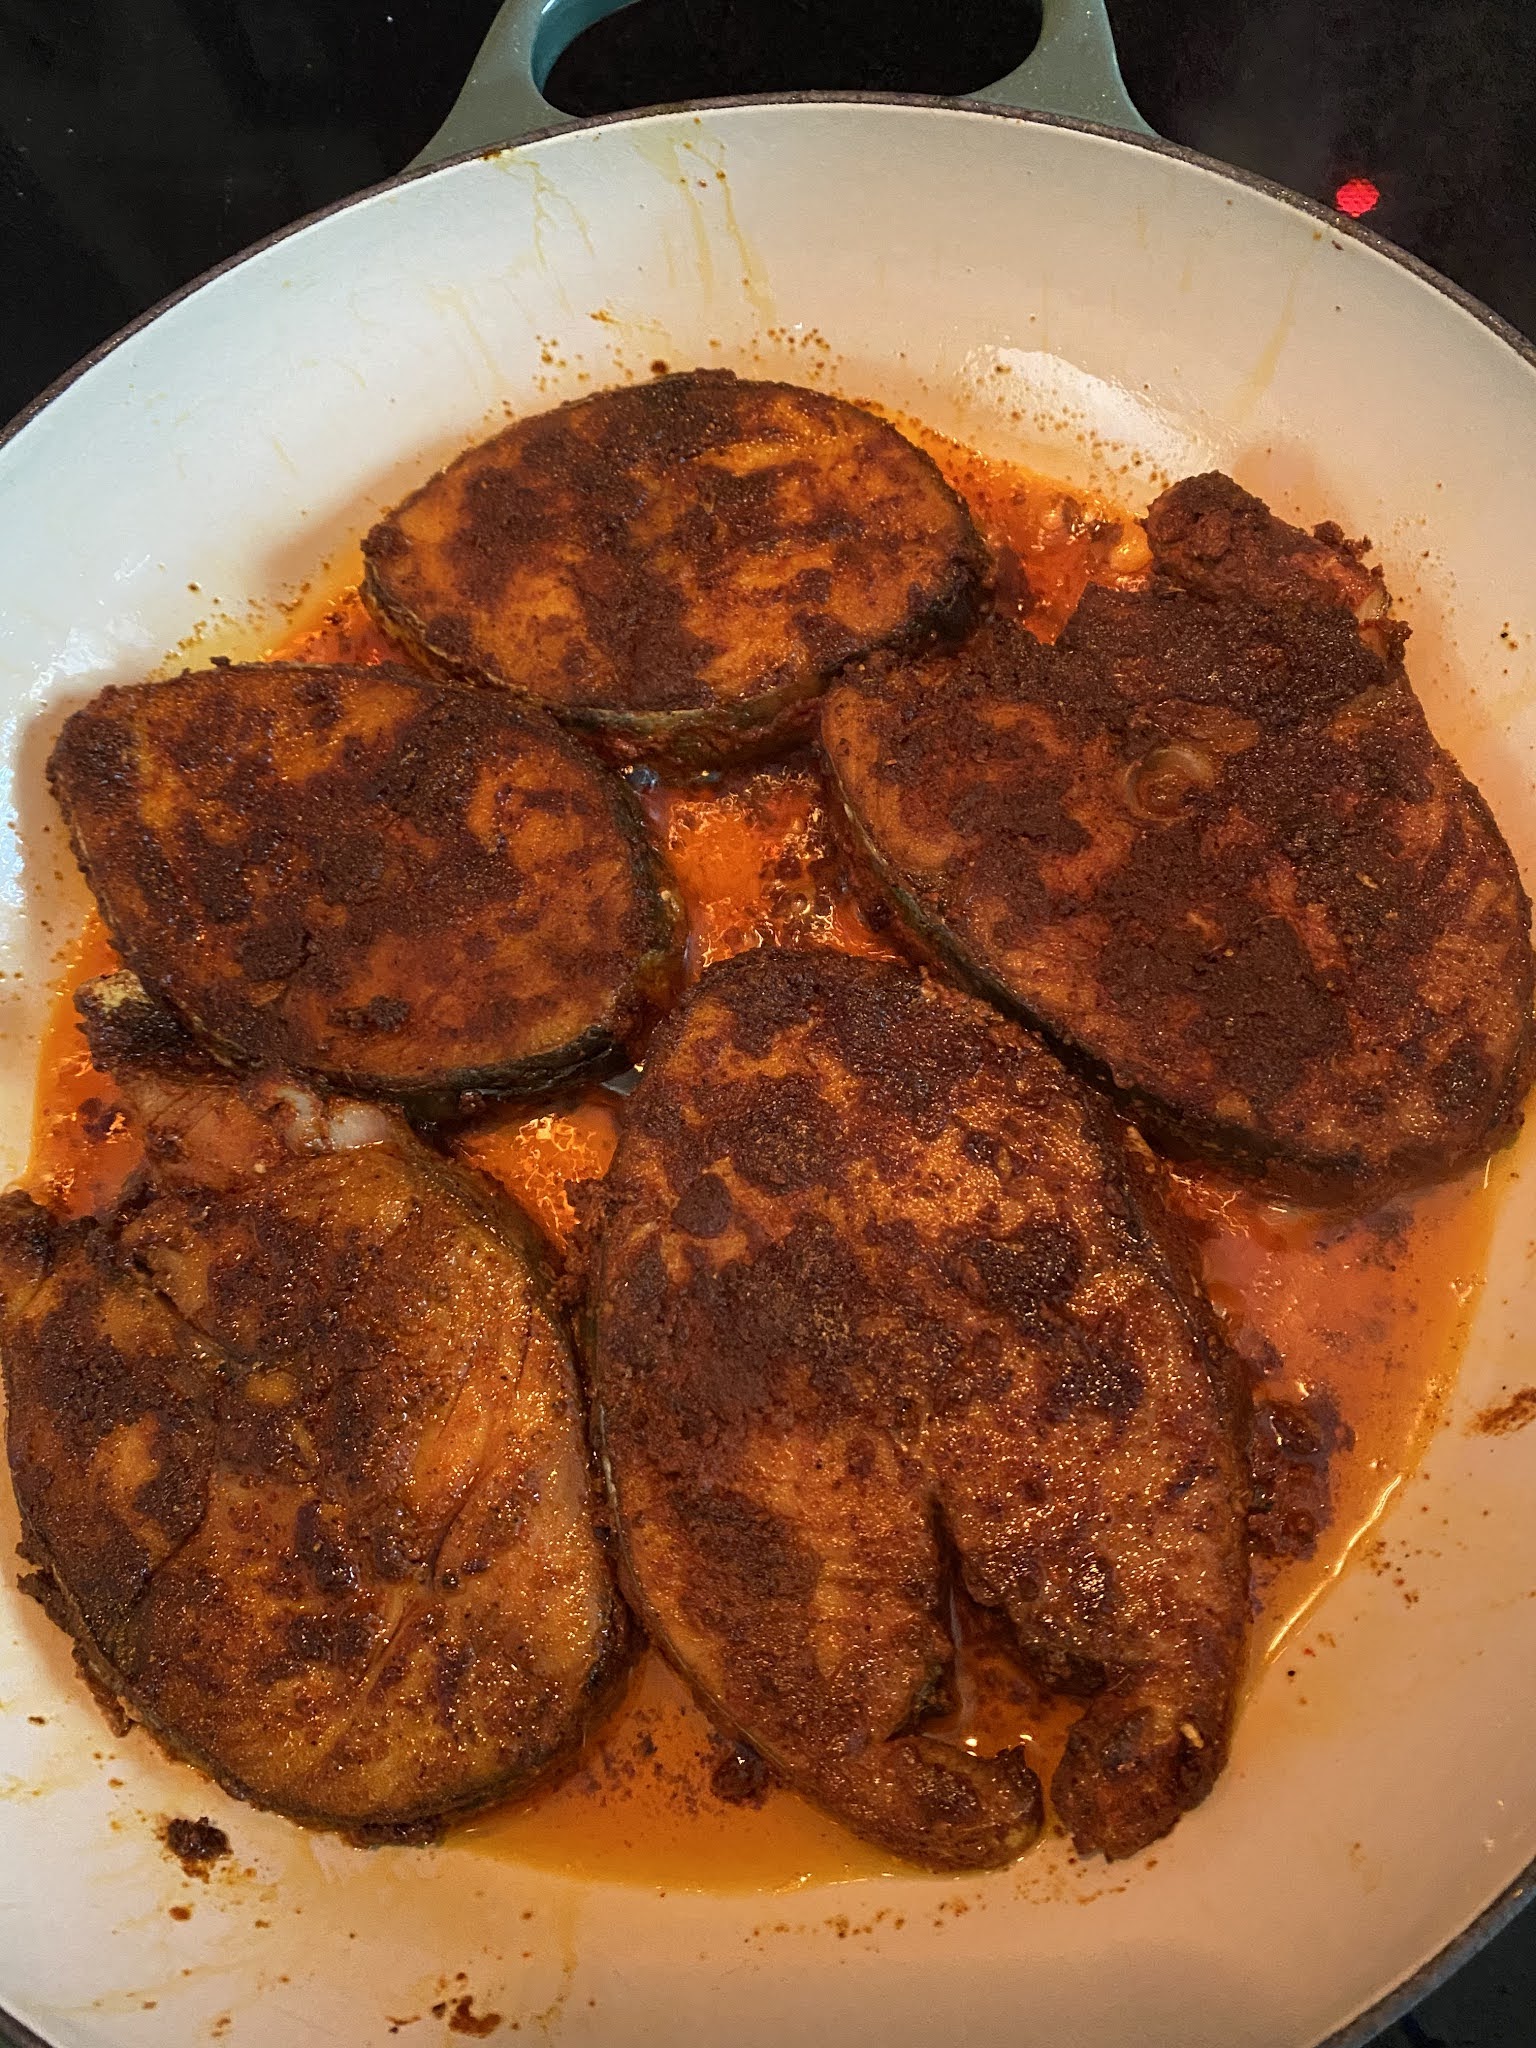
Cut chicken into large pieces, wash and drain. Depending on how much chicken you have, you can tweak the spices slightly in all steps to match to your taste.

Mix chicken with items from A,B,C,D and set to marinate overnight in the fridge or at least for two hours outside. Do not add E items including salt, if marinating overnight.

Take chicken out about one hour before cooking and add items from E, mix well together and set aside. Take the fried onions out too if done the day before.

Wash and soak the rice in water for 30 minutes, drain and set aside. This is also a good time to check with H to see if you can delegate papad making to him.

Set the instapot to 'saute' and heat 2 tbsp of olive oil.
Add the raisins and heat until they start to puff up and add the cashews. 2-3 minute all together should be good. Use a slotted spoon and set aside along with the golden fried onions for seasoning

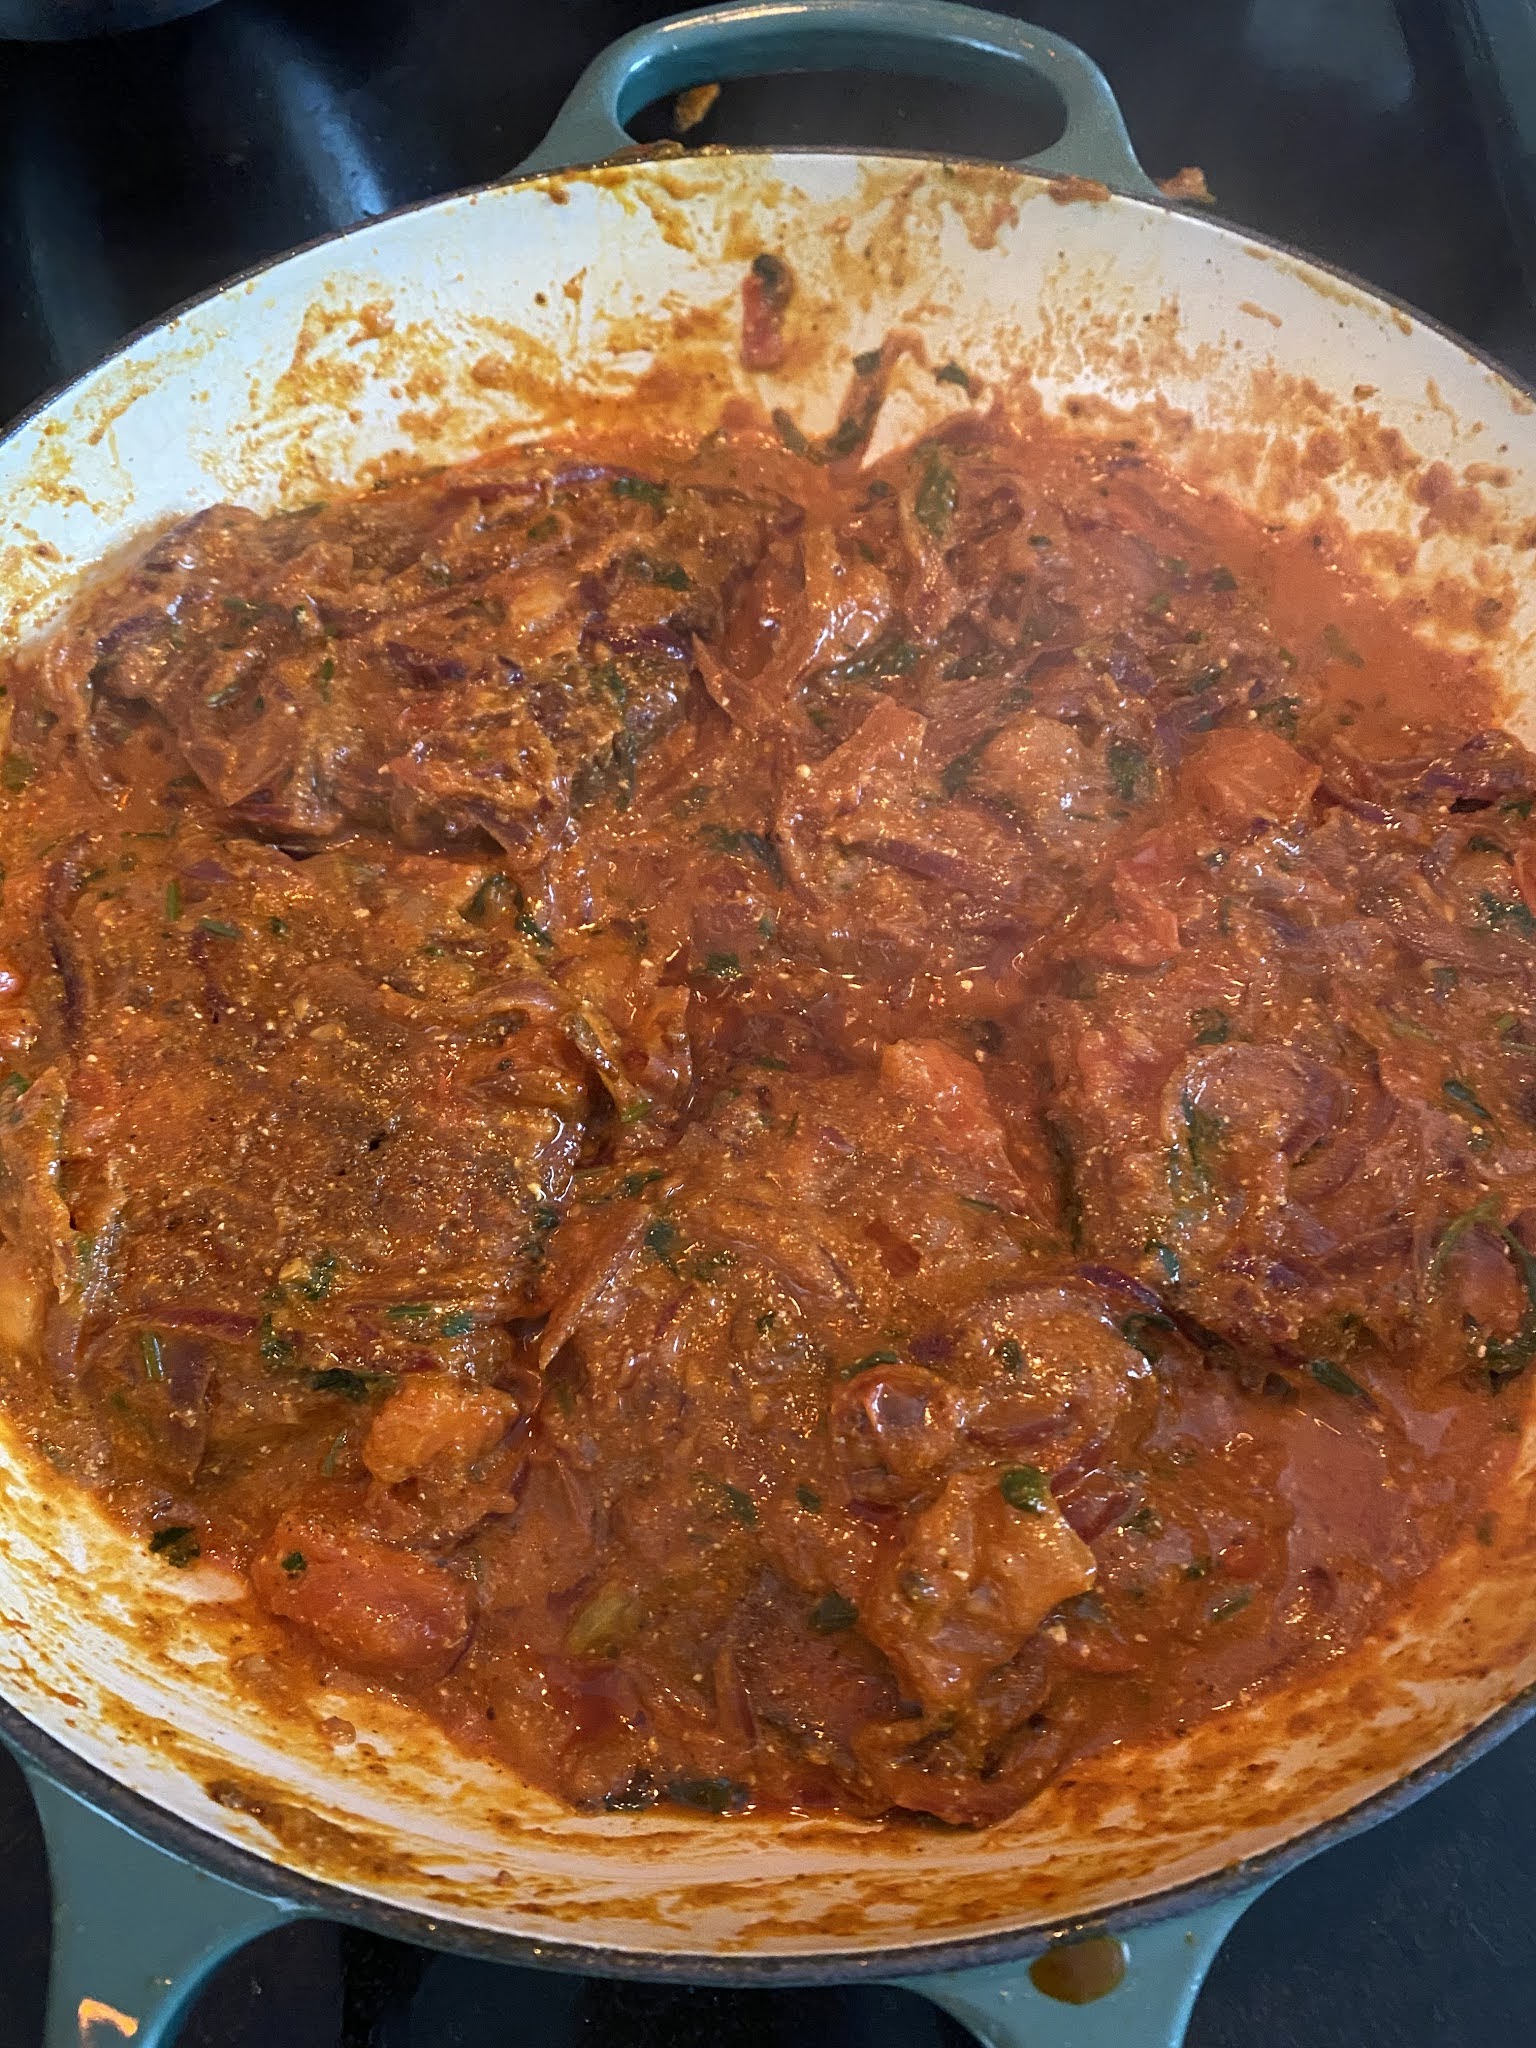
Add more oil if needed and add the 2" cinnamon stick. Mix in the onions for cooking and add the marinated chicken. Saute for 5-6 minutes.

Add 1/4 cup water to the chicken bowl to mix with remaining marinade  and add into the chicken at this time. Sprinkle in 1 tbsp or more of garam masala, add all the leaves from F for cooking and mix well. Remember to set aside 1/2 cup of cilantro from this for seasoning needs.

Do check to make sure the pot is still on 'saute' setting.

Check salt and add as needed at this step.  Might want to add a little more than needed to account for the addition of rice. It is good to see if you can reduce the water and make the gravy thicker at this step as that gives the chicken pieces a better color. I normally don't wait for this since the overall flavor is still great. With a wooden spoon and gentle stirring, make sure the bottom of the instapot bowl is deglazed and clean to avoid any BURN warnings later on.

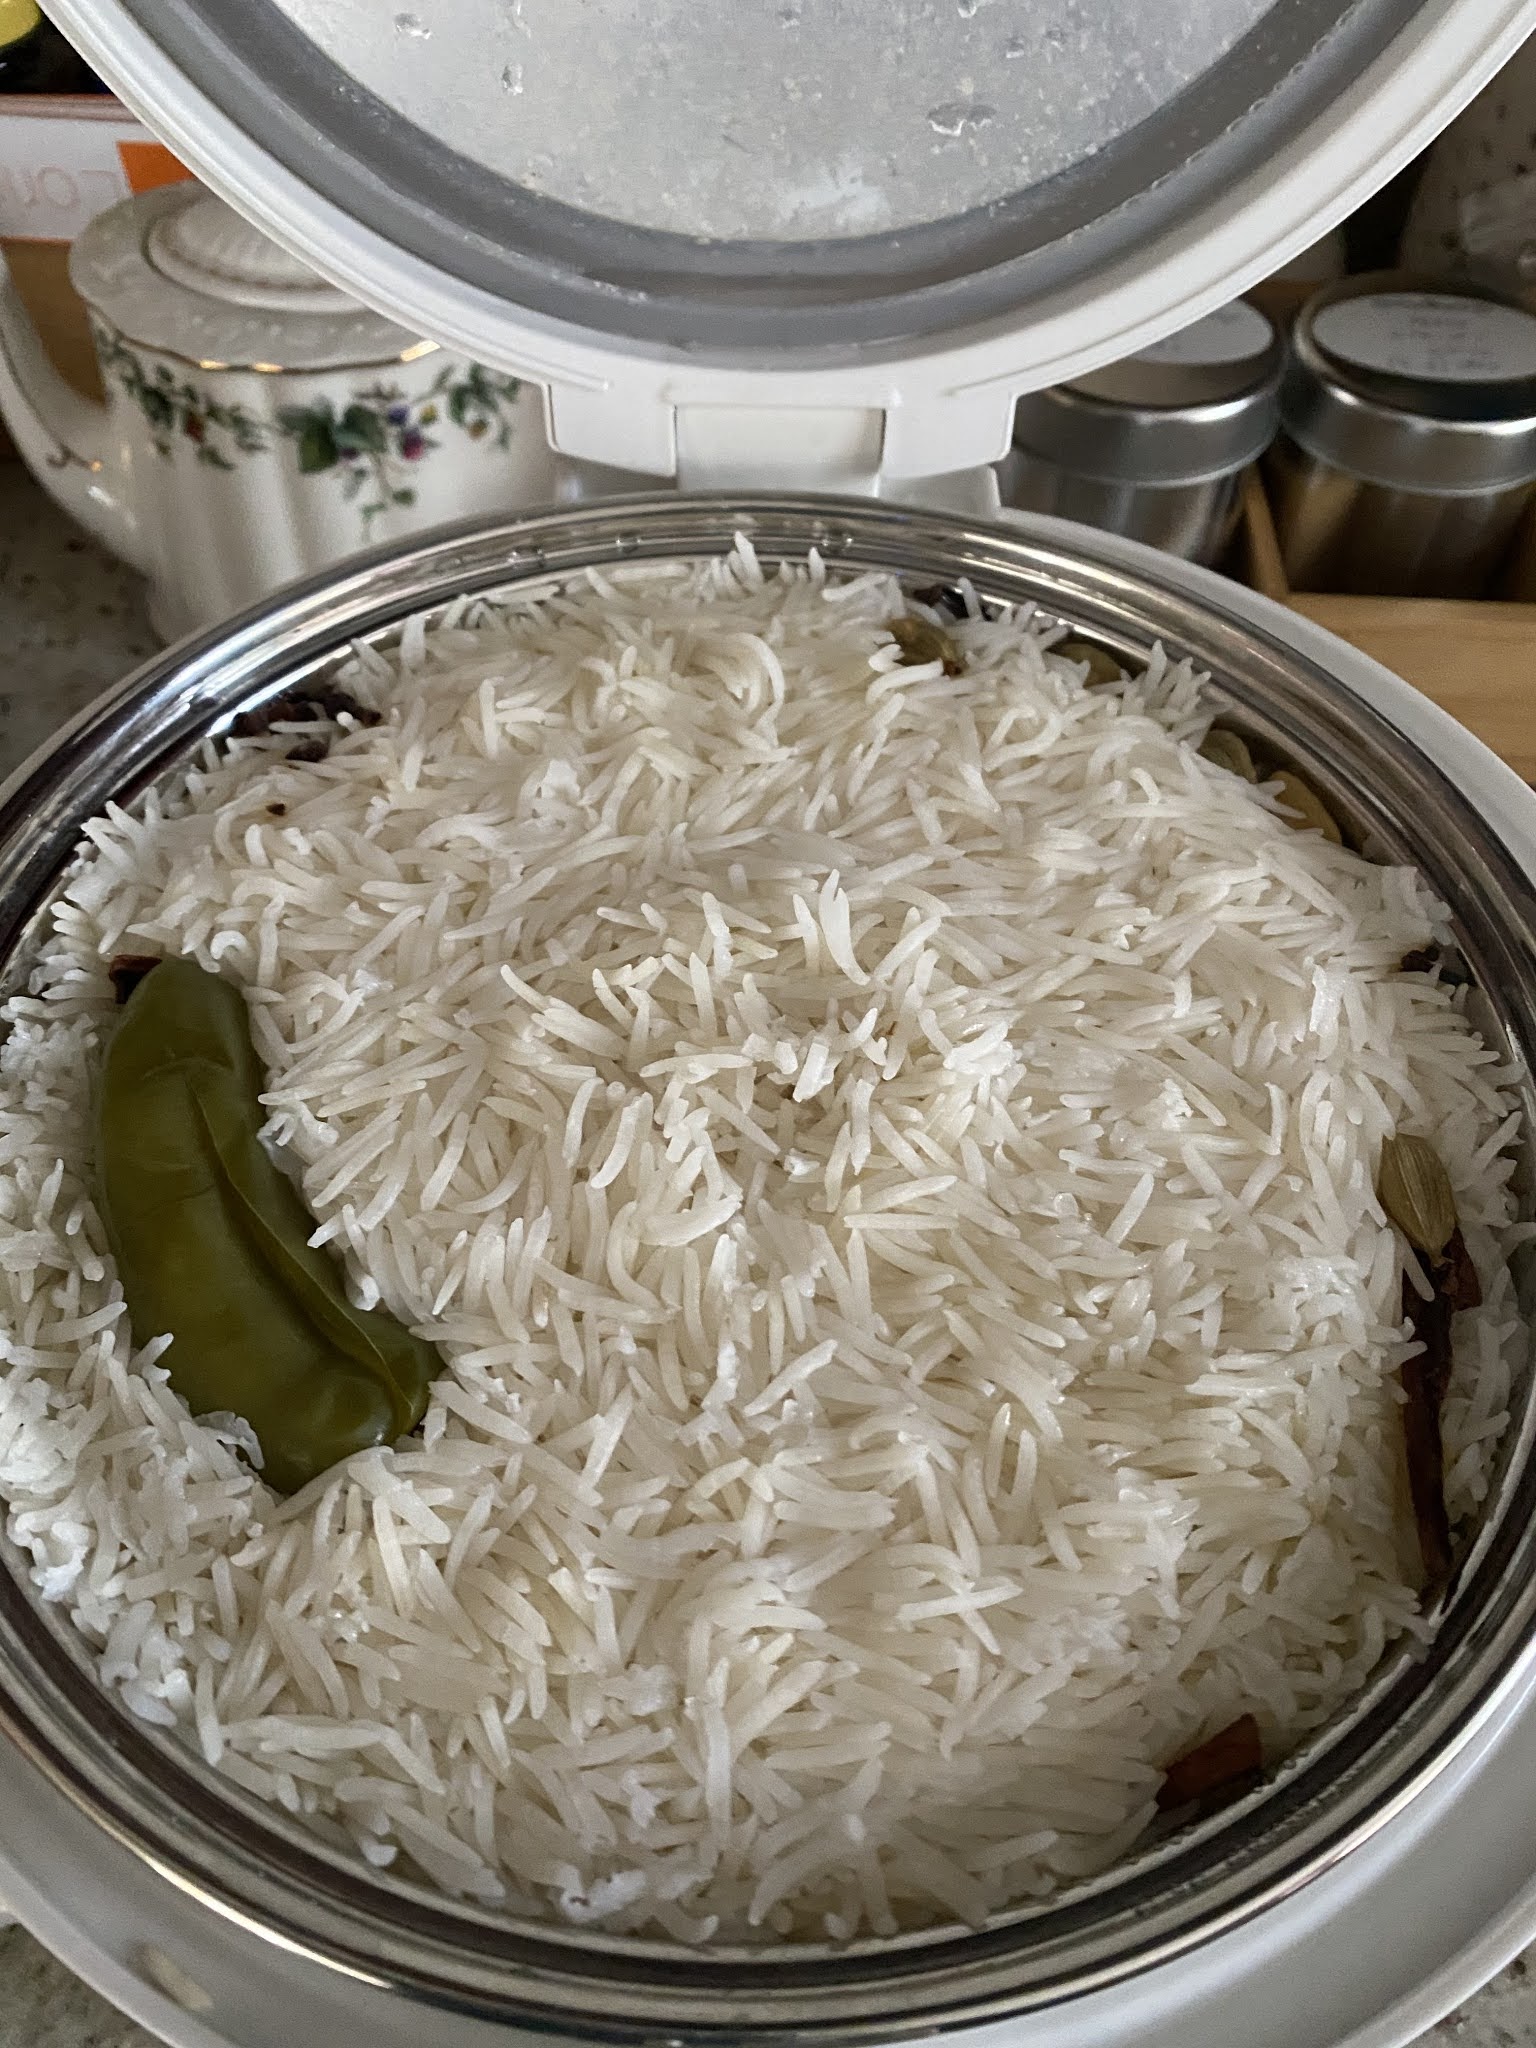
Layer the drained rice onto the top of the chicken mix. Sprinkle in some seasoning (mostly golden onions and some cashews, raisins, cilantro) in between the layers and on top. Do NOT mix. 

Add remaining 2 1/2 cups of water along the sides first and then at the center. Again take care to not mix anything. Check salt and add as needed by mixing only at the top layer.

Close the lid, pressure cook on high for 7 minutes and natural release for 10 minutes. Then open the seal valve and vent the pressure. 


Sunday, February 23, 2020

Lamb Biriyani with Raita: Instapot


My Instapot is a 3qt size so as to co-exist peacefully with the rest of the kitchen gadgets that reside on the countertop to make our everyday lives a bit easier. This has not stopped it from being the modern akshayapatra of our household. There is nothing it cannot do on its own! This week it was time for some lamb biriyani. I started off thinking I can use the same recipe used in the chicken biriyani version of last week. How naive was I! Lamb is a whole different animal both literally and figuratively. It has a different cooking time so to match that with the cooking time for rice, a marinate step is essential. Reading a few recipe blogs helped me to decide on a course of action most comfortable for me.

This time the steps were from spicecravings where I also picked up an easy way to sauté/caramelize the onions for this recipe. Essentially I followed what I did for the chicken biriyani for flavors etc and followed most of the steps from spicecravings for the actual cooking. Results were outstanding! I don't know if I'll want to eat out for biriyani anymore when I have my own personal biriyani pot😊

In the Mix


lamb - 1.25 to 1.5 lbs cut into medium sized pieces. 
(beef can also be substituted for lamb)

basmati rice - 2.5 cups
water - 2.25 cups
mint leaves - 1/2 cup chopped
cilantro leaves - 1/2 cup chopped

ghee - 1.5tbsp
olive oil - 4-5 tbsp

for garnish and cooking
cashew nuts - optional
raisins - 1/4 cup
1/2 big onion
shallots - 6

addon -1
cloves - 6
cardamoms - 5
black pepper corns - 1.5 tsp
garlic - 8 pods

ginger - 1.25" thin piece


addon -2
kalajeera - 1.5 tsp (or shahjeera)
cinnamon stick - 3/4 crushed
bay leaf -1
bombay biryani masala - 2 tbsp
salt to taste


addon-3
green chillies - 5 sliced

addon-4
garam masala - 1.5 tsp
turmeric - 1/2 tsp
paprika/kashmiri chili -3-4 tsp


How To Do

Cut the lamb to medium sized pieces, wash and set aside. I had about 50:50 ratio of bone-in to boneless pieces. 

In a pestle, crush all items from addon-1 in that order. Cloves, cardamom, pepper, ginger, garlic. Transfer to a bowl, add the meat pieces along with all items from addon-2. Kalajeera, cinnamon stick, bayleaf, biriyani masala and mix well together. Add salt to taste and marinate overnight in fridge or at least 1-2 hours for better results.  Before cooking, take the meat out and  keep at room temp for at least 30 minutes.

Soak the rice for 20-30 minutes, drain and set aside.

Turn on oven to 425 degrees and wait for it to reach temperature. Mix the onions and shallots with salt, 1 tbsp olive oil and 1/2 tbsp ghee and spread on a cookie sheet with aluminum foil. Bake in oven for 10-15 minutes stirring in between making sure the onions don't get burnt. Reserve half of the onions for cooking and keep the rest to be used later for garnish.

Turn on the sauté function of the instapot, add 1 tbsp of ghee and 2 tbsp of olive oil. Fry the raisins until they swell up, then the cashew nuts if using and keep with the onions set aside for garnishing.

Add 1-2 tbsp more of olive oil to the instapot pan and sauté the green chili from addon-3. sauté for 1-2 minutes, then mix in the reserved onions, add salt as needed and sauté for another 1-2 minutes. Check and make sure that the sauté function is still on while this is going on.


Now add the meat mix and sauté well on both sides for 4-5 minutes. Always check the bottom of the pan and scrape with a wooden spoon to make sure that there is no sticking to the bottom while sautéing. Now add items from addon-4 garam masala, paprika, turmeric and mix well together for 2-3 minutes. Check salt.

Spread rice on top, add water and check salt for taste. Do not mix but make sure the meat stays below the water level. Sprinkle mint and cilantro leaves on top. Close the lid and pressure cook on high for 7 minutes. Pressure release at normal for 10 minutes and release any remaining pressure manually. 

Now mix lamb and rice together into a serving dish, garnish with raisins and onions and enjoy endlessly with papads and raita.

All I can say is that the magic pot is here to stay.

Raita
I realized that I have not posted how to make raita anywhere. 

Need the following:
   big red inion - 1 sliced this
   carrot - 1 small diced to small pieces
   tomato - 1 medium diced to small pieces
   1-2 green chillies - sliced to thin disks
   cilantro - 1 tbsp chopped
   salt to taste
   vinegar to taste
   yogurt - enough to mix up the above

Take the onion in a bowl, generously pour vinegar and salt and mix/squeeze all well together. Wash/drain with cold water. Now check salt and vinegar and add both just enough to taste. To this add carrot, tomato, cilantro and green chilies and mix well together. Add in enough yogurt to cover all, check salt again  and enjoy with biriyani of any kind. 

Tuesday, February 18, 2020

Chicken Biriyani Instapot Edition

Like the air-fryer, instapot is another invention of the decade that has impacted how my kitchen activities evolved. Biriyani while highly palatable, had always evoked the image of a labor intensive dish in my food prep plans and so it never made it into a regular menu item. That is, until Mr. Instapot took a foothold on the crowded kitchen counter.

It was an uninspiring Monday of a lazy  3-day weekend and I was walking around musing on dinner ideas for the coming week. Too lazy to go to the grocery store and equally lazy to wash dishes. That is when the idea that has struck many a harried mother the world over occurred to me too. Make something with whatever is in the kitchen. Being an engineer by profession, I'd say laying out and executing a project plan is way easier than coming up with a dish plan on a whim. Not a natural cook by any means, I found that food videos and blogs inspire the latent cook in me. So watching and reading is what I did.

I had chicken legs at home and rice and the instapot too. I liked Vahchef's idea of a flavorful chicken biriyani in a cooker and myheartbeet's instapot steps were well laid out and precise. Decided to combine both with a bit of overlap in flavors and steps and voi-la born the biriyani that hitherto will be a constant go to product, er dish in my humble kitchen.

In the Mix


chicken legs - 6 

basmati rice - 2 cups
water - 2 cups
mint leaves - 1/2 cup chopped
cilantro leaves - 1/2 cup chopped

ghee - 1tbsp
olive oil - 3 tbsp

for garnish
cashewnuts - optional
raisins
2 shallots

addon -1
cloves - 4
cardamoms - 3
black pepper corns - 1 tsp
garlic - 5 pods

ginger - 3/4" thin piece


addon -2
kalajeera - 1 tsp (or shahjeera)
cinnamon stick - 1/2 crushed
bay leaf -2
biryani masala - 1 heaped tbsp
salt to taste


addon-3
green chillies - 5 sliced
shallots - 6 sliced thin

addon-4
garam masala - 1 heaped tsp
turmeric - 1/4 tsp
paprika/kashmiri chili -2 to 3 tsp


How To Do

Soak the rice for 20-30 minutes, drain and set aside.
Halve each of the chicken legs, wash and set aside.

In a pestle, crush all items from addon-1 in that order. Cloves, cardamom, pepper, ginger, garlic.
Transfer to a bowl, add the meat pieces along with all items from addon-2.
Kalajeera, cinnamon stick, bayleaf, biriyani masala and mix well. Add salt to taste and set aside for 30 minutes.

Turn on the saute function of the instapot, add 1 tbsp of ghee and 2 tbsp of olive oil. Fry the raisins until they swell up, then the cashew nuts and set aside. Saute 2 sliced shallots for 4-5 minutes and set aside all for garnishing later.

Add the remaining 1 tbsp of olive oil to the instapot pan and add the shallots and green chili from addon-3. Add salt as needed and saute for 6-7 minutes. Check and make sure to select the saute default timer does not get turned off.

Now add the meat mix and saute well on both sides. 6-7 minutes. 
Add items from addon-4 garam, masala, paprika, turmeric and mix well together for 2-3 minutes. Make sure to scrape the bottom of the pot so the BURNT won't show up later on. Deglaze with bit of water if needed. Check salt.

Spread rice on top. Add water. Do not mix together. Sprinkle mint and cilantro leaves on top. Close the lid and pressure cook on high for 7 minutes. Pressure release at normal for 10-12 minutes and release any remaining pressure manually. 

Garnish with raisins/cashews and onions, remove to a serving dish and enjoy unashamedly with papads and raita.

Unfortunately picture taking couldn't be done before the dish did its disappearing act. So that will have to wait until it gets made again which can't be that far off going by the glowing reviews.

Wednesday, July 6, 2016

Shrimp Biriyani - Quick and Easy - Kid Approved


My kids are lucky to have Haunt who enjoys being the grandma that they so need here. She is their paternal grandma's sister and so their great aunt. This last summer they were invited to spend a week with her in the East and both jumped at the chance. Molu doesn't like the idea of flying without us but she was willing to brave it just so she could be near this very dear person. Kannan was a 'go' from the first. They are all set to go again this summer. One of the things they enjoyed having at Haunt's place was the shrimp biriyani. She said it is simple to make since they don't like a lot of things to be put in it. Works for me! It took a few tries to get it right but now we all enjoy this delicious dish.

In the Mix

shrimp -  3/4 lbs. (12 oz.) medium sized, deveined, shelled, washed and drained

for the marinade
chili powder - 1/2 tsp or less
lime juice - 1 tsp (fresh squeezed)
turmeric - 1/4 tsp
salt - 1/4 tsp

basmati  rice - 4 cups cooked (leftover rice is OK)

olive oil - 3 tbsp
onion - 1 small or 1/2 medium sized - diced
ginger - 1/2 "
chicken biriyani masala -  1 heaped tbsp. or to taste

onion - 1/2 sliced thin. (optional for garnish)
cashew nuts halved - 1 tbsp (optional for garnish)
coconut oil - 2 tsp


How To Do

Mix the cleaned the shrimp with marinade ingredients and let sit overnight in the fridge. If there is no time for overnight, then marinate at least for half an hour at room temp.

Cook the rice in a rice cooker. Add a little less water than recommended so the biriyani rice is not over cooked. Mix with salt as needed using a fork to separate out the rice and set to cool. If the biriyani masala is salty, you might not want to add salt to the rice at this time.

Preheat your toaster oven to 300C.

Heat the oil in a 12" frying pan and add the shrimp. Keep the heat on high to make the process quick. Make sure to keep the shrimp in a single layer. After about a minute, turn over gently with a spatula. Another minute or two will be enough for the shrimp to cook evenly. Remove from heat and drain on paper towels.

Grind the onion and ginger together. I use an immersion blender for a quick grind. Add salt here as needed. HAunt tip: You can add one raw or cooked shrimp to the blender for a flavor burst in the gravy.

Add onion mix to the remaining oil in the pan. Save extra oil if any to mix later with rice. Saute for a few minutes and add biriyani masala. Add salt as needed. Now add the shrimp and mix all together.
The prepared shrimp can be refrigerated at this time to make the biriyani another day. Just heat gently before using as follows.

Mix the cooked rice with any gravy remaining in the shrimp pan. Add leftover shrimp oil if any and add salt as needed.

Spread the bottom of a small baking dish with the shrimp mix. Layer on top with the rice and bake at 300C for 20 minutes. Kid approved shrimp biriyani is best enjoyed with plain yogurt to keep it all simple. I am sure no one will complain if you decide to add the customary papadam and some raita to the menu.

Optional garnish can be sprinkled on top for those who want the biriyani to look a bit more dressy.
Simply fry the onions and saute the cashews in 1 tsp ghee or coconut oil. Drain on paper towels and sprinkle on top in your own plate so the little onion sleuths who are also the main customers will not complain.

Thursday, August 20, 2009

Kappa Biriyani - Tapioca (Cassava) with Beef

Anything Kappa does not last for long in our house once made. So we always make this in large quantities. It can be had as a main meal or as a filling snack. Remember those hungry evenings when you get back from work ready to eat an elephant? Just roll the Kappa Biriyani into a large ball and take as big bites as you can and that will assuage the hunger right away. To heat or not to heat is totally up to you... I didn't dare venture into making Tapioca here till later. But once I hit on the right way of doing things, cannonballs couldn't stop me. The easiest for Kappa is of course this drum cut version. That has its own charms but the version with beef is unparalleled in yumness and I can't keep my hands off of it once prepared. In The Mix Tapioca - 4 to 5 roots or pieces. Shredded Coconut - 2/3 cup Red onion - 1 full - thinly sliced (can use 5-8 large shallots also) Turmeric powder - 1/2 tsp Green chili - 2 or 3 Salt to taste For The Beef Beef - 1/2 to 1 lbs or what comes in a small pack Red onion - 1 large thinly sliced garam masala - 1/2 tsp turmeric powder- 1/4 tsp coriander powder- 2 to 3 tbsp chili powder - 3 tsp ginger - 1" pelled and thinly sliced garlic - 2 or 3 pods, crushed & then sliced across curry leaves - as many as makes you happy or 1 sprig salt to taste oil to season mustard seeds - 1/2 tsp How To Do This method of preparation was considered labor intensive and I wasn't going to try anything regardless of how good it tasted. Then I figured out an easy way - sans some elegance - and now Kappa Biriyani is a regular feature whenever we come across a healthy bunch of tapioca roots in the Chinese store. Drum cut the 'kappa' like you would for the 'chendamuriayan' and peel off the skin. Normally the next laborious step is to chip away into smaller pieces till only the central vein remains. This step is not a must and you can just go on and cook with salt and water. The only drawback is you might have to pull out veins from the final dish. If an ardent eater like me thinks it is not a big problem then you can can plunge along with me and have an easy life with Kappa Biriyani to keep you company:-) It is easier to just remove the vein gently from the cooked tapioca whenever you come across one. There you have it. I have divulged the secret! Anyway, do cook the tapioca please and drain the water. Be careful not to get burnt while doing this. Add The Gravy Prepare the gravy mix while tapioca is being cooked. Take the coconut, tumeric, salt, onion and green chilies and grind together in a blender with enough water. As soon as the water is drained from the cooked tapioca, make a hole and add half of the mix towards the bottom. Add the rest to the top and cover over with tapioca. Cover and cook for 2-3 minutes on low heat. Be nearby to prevent any burning up. Then remove from heat and mash with a wooden spoon like there is no tomorrow. As mentioned above, do remove any veins that you come across. I will not be responsible for any vein damage. Mix well so that the gravy is well spread and the tapioca is mashed nicely. Not too mashed up but mashed enough to keep it all sticking together. Add The Beef The beef can be prepared at this stage as I have done many times or while tapioca is on the stove. Either way it will be OK. Break mustard in heated oil and add onion and curry leaves. Add salt and saute well. Add ginger and garlic and saute on low heat. Once everything mixes together nicely and begins to brown, add all the powders together. Add a little water to help all blend together in the pan. Roast till the familar scent of the spices fill the air and add the meat. Fry on medium heat for a few minutes. Cover and cook. No need to add water at this stage. Add this beef to the prepared tapioca and mix gently but surely together till the biriyani of your dream emerges. Sit down and enjoy with a cup of coffee and some pickle or yogurt if you are into those. Will keep in fridge for almost a week and watch your hungry evenings fly by like a dream...

Tuesday, April 8, 2008

Lamb Biriyani


I am back to the cooking, taking pics and writing about it mode.


I always had the idea that a biriyani is a difficult item to make all by myself unlike fried rice or pulau. The name biriyani somehow conjures up delicate, elaborate and time consuming effort behind it. So when we visited a friend’s place and they had prepared biriyani for us I was quite wonderstruck that they would go to so much trouble for us. You see, we sort of forced an invitation on them because we were visiting their state and they graciously invited us for dinner even though both were sort of sick. So this was an extra surprise. When I expressed this feeling of awe at the extent of their hospitality, the friend sheepishly informed me that actually a biriyani is the most trouble free dinner preparation as it can stand on itself on the dinner table with the simple accompaniment of some raita, papad and pickle. I realized then that this is true because if you prepare plain or even fried rice, then you have to have at least one or two fish and meat items, a dry vegetable item, a gravied curry and other such accompaniments including cutlets or even appam and stew. At least that is how it goes in my head. Ever since that, I have dazzled many a group of friends and family at dinner with my “elaborately prepared” lamb biriyani:-) They are all probably onto it I know but are always kind to shower me with good words of praise.


My husband is not a great fan of chicken as I’d mentioned earlier and I don’t really look forward to seeing beef in a biriyani. So we settled in on lamb as the ideal meat for “our” biriyani. We don’t use any other meat but the lamb available in regular grocery stores. I did try it with the goat meat available from ‘halal’ stores but somehow did not come out as well as the lamb.


My recipe started out heavily dependent on KMM’s recipe for biriyani but evolved over time to a proper creation.

In The Lamb Mix
Lamb – 2 lbs, cut to decent sized pieces.
Cinnamon stick – 2” piece
Cardamom – 4 crushed
Cloves – 12 to 14
Ginger – 1 ½”
Garlic – 4 pods
Green chili – 2 (each sliced into 4 pieces)
Masala powder – ¼ tsp (this can be made in house by adding together cinnamon powder, cardamom powder and cloves powder together in equal or reasonable proportions)
Onion – ½ big red onion sliced thin lengthwise
Grated coconut – ¼ cup (mix with a little water to hydrate if dry – hydrating & coconut optional)
Curry leaves – 1 sprig
Coriander powder – 2-3 tbsp
Kashmiri Chili powder – ½ tbsp
Chili powder – 1 tsp
Milk – 2 cups (warmed in microwave)
Water enough to cook lamb
Salt to taste
Oil – as needed (I use olive oil and find that 1 tsp of ghee will do a lot towards enhancing taste. Adding more ghee than this does not seem to benefit and rather gives the food a heaviness that we don’t prefer)


For Marinade:
Vinegar – 2 tbsp
Slat to taste
Chili powder – ¼ tsp
Coriander powder – 2 tsp
Turmeric – ¼ tsp

How To Do
Wash the lamb pieces and marinate 1 hour or more (in fridge if more) with salt, vinegar and the marinade powders.

Chop the ginger, garlic and green chili together. Heat oil in a large pan and roast cinnamon, cloves and cardamom. Add masala powder here and fry for a short time before spices go burnt. Remove from heat when in doubt and keep sautéing. Add the chopped stuff and sauté on low heat for a while. Add onions, salt and curry leaves and stir together till onions give up looking stiff. Add the coconut and fry for a short time and add the remaining curry powders. Roast on slow heat till the mix rolls around or the aroma fills the air. This is an important part. Be patient while the gravy gets nicely roasted and you will be well rewarded in taste. Add the ghee at any point in the above steps.

Now add the lamb pieces and blend well together. Fry mildly for 5-6 minutes making sure the pieces are stirred for even exposure. Add the warm milk and enough water just to reach the top of the pieces and stir together. Check salt and add if needed. Wait till it boils at high heat and then cover and cook in medium heat. Lamb takes longer than the other meats which gives you time to do productive stuff like finishing off that half read paper or to down a glass of orange juice to hydrate yourself from all the proximity to heat:-)Cook about 18-23 minutes. Cook more if needed. Meat needs to be fully cooked. Make sure that gravy is concentrated rather than watery. The last step can be open and cook for 5 minutes or so to reduce water if needed. Remove from heat.

In the Biriyani Mix


Basmati rice – 6 cups
Black Raisins – 6-7 tbsp (only because I love them so! Add or remove as you please)
Turmeric powder – 2 tsp (add or remove based on your color preference)
Shallots – 10 sliced thin
Curry leaves – 1 or 2 sprigs
Ghee or olive oil – as needed
Salt to taste

How To Do

For Rice:
Cook the rice in a rice cooker following the exact water requirement for the cooker. Usually when I cook basmati rice I always add lots more water than recommended as otherwise I find the rice very dry and hard cooked for our palate. But for the biriyani preparation this non-sticking but cooked format is ideal. Don’t forget to add some salt to the water when cooking.

For Flavor:
Heat oil in a pan and sauté the turmeric powder, add sliced shallots and sauté some more and add curry leaves and stir together. Add the raisins and salt - remember the rice has some salt already - and sauté the whole mix till the raisins fluff up to a ball and the onions are an appetizing crispy brown. Remove from heat.

Take a large bowl and mix the prepared onion/raisin mix with the rice using a fork so as the rice gets colored evenly yellow. At this point my daughter likes to help herself to a healthy dose of the rice. She prefers it this way before the meat gets added on. My son is not into colors when it comes to rice and I make sure that I set aside some untouched white rice for him:-)

Layering and Oven
Preheat oven to 250 Deg. Take a baking pan and coat with melted butter. Place the lamb pieces first. Keep all the gravy and some small pieces for the next layer. Then add a layer of the prepared rice. Now spread the gravy and remaining lamb pieces and top off with another layer of rice. The oven step is just to bring out the flavors and blend. So cover with an aluminum foil and keep in preheated oven for 15 minutes. Turn off oven and keep inside till you are ready to serve. No need to mix the layers as that will happen on its own when serving. Enjoy with raita, papads and lime pickle for the full experience. Remember, only lime pickle goes with biriyani. OK, you are free to select a pickle of your own choice having toiled this far:-)

How to make this an easy and tasty task:
Marinate and prepare the lamb curry 2 or 3 days ahead. Keep in the fridge. Sitting in curried state makes it tastier. Make the flavor mix also 2 or 3 days ahead and keep in the fridge. May not necessarily increase the taste but reduces effort on D-Day.

Now all you need on the day you plan to make the biriyani is just cook the rice, heat up the lamb and flavor mix and do the layering and oven step from above. Raita is best prepared the day it is being served, but papads can be made as early as one day ahead if your climate is not humid.